
Traditional Braciole Recipe: 10 Powerful Tricks for Tender Beef
Table of Contents
There are some dishes that do more than feed you. They slow you down. They pull you into the kitchen, make you focus, and remind you why cooking with patience still matters. A traditional braciole recipe is exactly that kind of dish.

When you prepare braciole the right way, you are not rushing dinner. You are building flavor step by step, allowing time, heat, and simple ingredients to do what they do best. If you have ever wondered why your braciole turned out chewy, dry, or bland, this guide is written for you. You are about to learn how to make tender, deeply flavorful braciole using proven techniques that Italian home cooks rely on.
What Is a Traditional Braciole Recipe?
A traditional braciole recipe is a classic Italian preparation where thin slices of beef are filled, rolled, and slowly cooked in sauce until tender. While many people associate braciole with Italian-American Sunday dinners, the roots of the dish come directly from regional Italian kitchens.
In Italy, braciole is not a single fixed recipe. Instead, it changes depending on the region, the cut of meat available, and family tradition. What stays consistent is the technique:
- Thin beef slices
- A simple, savory filling
- Slow cooking to break down fibers
When you understand this foundation, you stop treating braciole as just another beef dish and start cooking it with intention.
Why This Traditional Braciole Recipe Produces Tender Beef
Tender braciole is not about luck. It comes from understanding how beef behaves during cooking and working with it instead of against it.
Here is why this braciole recipe works:
- Thin cuts allow heat to penetrate evenly
- Pounding breaks down muscle fibers
- Slow simmering converts collagen into softness
- Proper rolling keeps moisture locked in
If your past attempts failed, it is usually because one of these steps was rushed or skipped. Once you correct that, tenderness becomes predictable.
Ingredients for a Traditional Braciole Recipe

Essential Ingredients
Below is a clear ingredient table to help you prepare with confidence.
| Ingredient | Purpose | Notes |
|---|---|---|
| Beef (top round or flank) | Main structure | Thinly sliced |
| Garlic | Aromatic flavor | Fresh cloves |
| Italian parsley | Freshness | Finely chopped |
| Breadcrumbs | Binding | Preferably homemade |
| Parmesan cheese | Depth and umami | Finely grated |
| Olive oil | Moisture and richness | Extra virgin |
| Tomato sauce | Braising base | Low acidity preferred |
| Salt and black pepper | Seasoning | Adjust gradually |
These ingredients may look simple, but when combined correctly, they create layers of flavor that feel complex without being heavy.
Optional Ingredients That Still Respect Tradition
Some families add extras to personalize their braciole recipe:
- Pine nuts for texture
- Raisins for subtle sweetness
- Prosciutto for richness
You should treat these as enhancements, not replacements. The beef and technique should always remain the focus.
Best Cut of Beef for a Braciole Recipe
Choosing the right cut is one of the most important decisions you make.
Recommended Cuts
- Top round: Lean, affordable, and ideal when sliced thin
- Flank steak: Strong beef flavor and excellent when pounded properly
- Sirloin tip: A good balance between tenderness and structure
Cuts You Should Avoid
- Ribeye (too fatty and expensive)
- Chuck (requires much longer cooking and changes texture)
When you choose a cut that responds well to slow cooking, you set yourself up for success before you even start.
How to Prepare Beef for a Perfect Braciole Recipe

Step-by-Step Beef Preparation
- Slice the beef thin against the grain
- Pound each slice evenly using a meat mallet
- Season lightly with salt and pepper
- Lay the slices flat for filling
Each step has a purpose. Skipping one almost always leads to tough braciole.
Common Preparation Mistakes
- Leaving the beef uneven in thickness
- Over-seasoning early
- Skipping the pounding step
When you slow down here, the rest of the recipe becomes much easier.
The 10 Powerful Tricks for Tender Beef in a Braciole Recipe
Mastering a truly tender braciole recipe is not about following one secret step. It is about stacking small, intentional decisions that work together from start to finish. When you understand why each step matters, you gain full control over texture, moisture, and flavor. These ten techniques are the exact difference between braciole that feels chewy and braciole that melts as you cut into it.
1. Choose the Right Cut of Beef From the Start
Tender braciole begins before you ever turn on the stove. You need a cut of beef that responds well to thin slicing and slow cooking.
Lean cuts such as top round or flank steak work best because they:
- Slice cleanly into wide sheets
- Absorb seasoning efficiently
- Soften gradually during braising
Avoid cuts with heavy marbling or thick connective tissue. Those cuts require entirely different cooking methods and often lead to uneven results in a braciole recipe.
2. Slice Against the Grain Every Time
If you want tender beef, the direction of your knife matters more than you might expect. Muscle fibers run in visible lines through the meat. When you slice with those lines instead of across them, you create longer fibers that resist chewing.
By slicing against the grain, you:
- Shorten muscle fibers
- Reduce chew resistance
- Improve tenderness without changing cooking time
This single adjustment instantly improves texture, even before cooking begins.
3. Pound the Beef Evenly, Not Aggressively
Pounding beef is not about force. It is about consistency.
When you pound the slices gently and evenly:
- Thick spots thin out
- Cooking becomes uniform
- The filling spreads more evenly
Avoid smashing the meat until it tears. Over-pounding weakens structure and causes filling to escape during cooking. Your goal is a smooth, flexible sheet that rolls easily without resistance.
4. Season the Meat Lightly and Strategically
Over-seasoning early is a common mistake in many braciole recipes. Salt draws moisture out of beef over time, which can work against tenderness if applied too aggressively at the beginning.
Instead:
- Lightly season the beef itself
- Let the filling and sauce carry most of the flavor
- Adjust seasoning gradually during cooking
This layered approach creates depth without drying out the meat.
5. Balance the Filling for Moisture, Not Bulk
The filling should support the beef, not overpower it. Too much filling prevents proper rolling and causes the meat to steam instead of braise.
A balanced filling:
- Adds moisture
- Enhances flavor
- Maintains structure during simmering
You should be able to spread the filling thinly and still see the beef beneath it. That balance ensures even cooking and proper tenderness.
6. Roll Firmly but Never Too Tight
Rolling technique directly affects texture. Loose rolls fall apart. Over-tight rolls squeeze out juices.

When rolling braciole:
- Keep the roll compact
- Avoid stretching the meat
- Leave enough give for expansion during cooking
A properly rolled braciole holds moisture inside while allowing heat to circulate evenly.
7. Secure the Braciole Correctly Before Cooking
How you secure your braciole matters more than most people realize. Loose rolls shift in the pan, exposing edges and drying out sections of meat.
Use:
- Kitchen twine for even pressure
- Toothpicks placed strategically, not randomly
Proper securing keeps the roll intact and ensures consistent tenderness from edge to center.
8. Always Sear Before Braising
Skipping the sear is one of the fastest ways to flatten flavor. While searing does not seal in juices, it does create surface complexity that enhances the final dish.
A proper sear:
- Develops flavor through browning
- Adds structure to the roll
- Prevents the beef from tasting boiled
You only need a quick sear over medium heat. The goal is color, not full cooking.
9. Simmer Low and Slow—Never Boil
Boiling is the enemy of tender beef. High heat tightens muscle fibers and forces moisture out of the meat.
For a tender braciole recipe:
- Keep the sauce at a gentle simmer
- Avoid bubbling or rapid movement
- Cook patiently
Low heat allows collagen to break down gradually, transforming firm beef into something soft and sliceable.
10. Rest and Slice the Braciole the Right Way
Once cooking is finished, your job is not over. Resting is essential.
Allow the braciole to rest before slicing so:
- Juices redistribute
- Fibers relax
- Slices hold together cleanly
When slicing, always cut against the grain. This final step ensures that every bite feels tender, even at thicker cuts.
Why These 10 Tricks Work Together
Each of these techniques supports the others. When you apply them as a system, tenderness becomes consistent and repeatable. You are no longer guessing or hoping for good results. You are controlling them.
This is what separates an average braciole recipe from one that people remember.
Step-by-Step Traditional Braciole Recipe Instructions

Cooking a traditional braciole recipe is a methodical process. When you follow each step with intention, you control texture, flavor, and moisture from start to finish. This section walks you through the entire process in a clear, practical way so you can cook with confidence instead of guessing.
Step 1: Prepare and Lay Out the Beef
Start by placing your thin beef slices on a clean work surface.
What you should do:
- Pat the beef dry with paper towels
- Check for uneven thickness
- Pound gently where needed to even it out
Why this matters:
Even thickness ensures consistent cooking. Thick spots stay tough while thin areas overcook, so this step directly affects tenderness in your braciole recipe.
Step 2: Season the Beef Lightly
Season the beef slices with restraint.
Seasoning guidelines:
- Light sprinkle of salt
- Freshly ground black pepper
- No heavy seasoning at this stage
Why light seasoning works:
You will add flavor through the filling and sauce later. Over-seasoning early can draw out moisture and reduce tenderness.
Step 3: Prepare the Traditional Braciole Filling
In a bowl, combine your filling ingredients.

Typical filling components:
- Breadcrumbs
- Grated Parmesan cheese
- Minced garlic
- Chopped parsley
- Olive oil
Mix until the texture feels moist but not wet. The filling should hold together lightly when pressed.
Key tip:
If the filling feels dry, add olive oil—not water. Oil keeps the filling rich without making it heavy.
Step 4: Spread the Filling Evenly
Spoon a thin layer of filling onto each beef slice.
Important rules:
- Leave space around the edges
- Do not pile the filling
- Keep thickness consistent
You should still see the beef beneath the filling. This balance allows the roll to cook evenly and prevents bursting during simmering.
Step 5: Roll the Braciole Properly
Roll the beef tightly enough to hold its shape but gently enough to keep moisture inside.
Rolling technique:
- Fold in the sides first
- Roll from the bottom up
- Keep steady pressure without squeezing
A well-rolled braciole stays intact and cooks evenly from edge to center.
Step 6: Secure the Rolls
Once rolled, secure each braciole.
Best options:
- Kitchen twine for even pressure
- Toothpicks placed horizontally
Make sure the rolls feel firm but not compressed. Proper securing prevents unraveling and uneven cooking.
Step 7: Sear the Braciole Before Braising
Heat olive oil in a wide pan over medium heat. Add the braciole rolls and sear on all sides.
Searing guidelines:
- Turn gently
- Brown lightly, not deeply
- Avoid overcrowding the pan
Why this step is essential:
Searing builds flavor and helps the braciole maintain structure during slow cooking.
Step 8: Add the Sauce and Begin Braising
Once seared, add your tomato sauce directly to the pan.
At this stage:
- Reduce heat to low
- Ensure braciole is partially submerged
- Gently move sauce around the rolls
The sauce should barely bubble. Aggressive boiling will tighten the meat and ruin tenderness.
Step 9: Simmer Low and Slow
Cover partially and allow the braciole to simmer.
Ideal conditions:
- Cooking time: 90–120 minutes
- Heat: low, steady simmer
- Stir sauce occasionally, not the rolls
As the braciole cooks, connective tissue breaks down, turning firm beef into tender slices.
Step 10: Check for Doneness and Rest
The braciole is ready when:
- A knife slides in easily
- The rolls feel soft, not springy
- The sauce has thickened naturally
Remove the braciole from heat and let it rest for 10 minutes before slicing.
Why resting matters:
Resting allows juices to redistribute, preventing dryness when you cut into the meat.
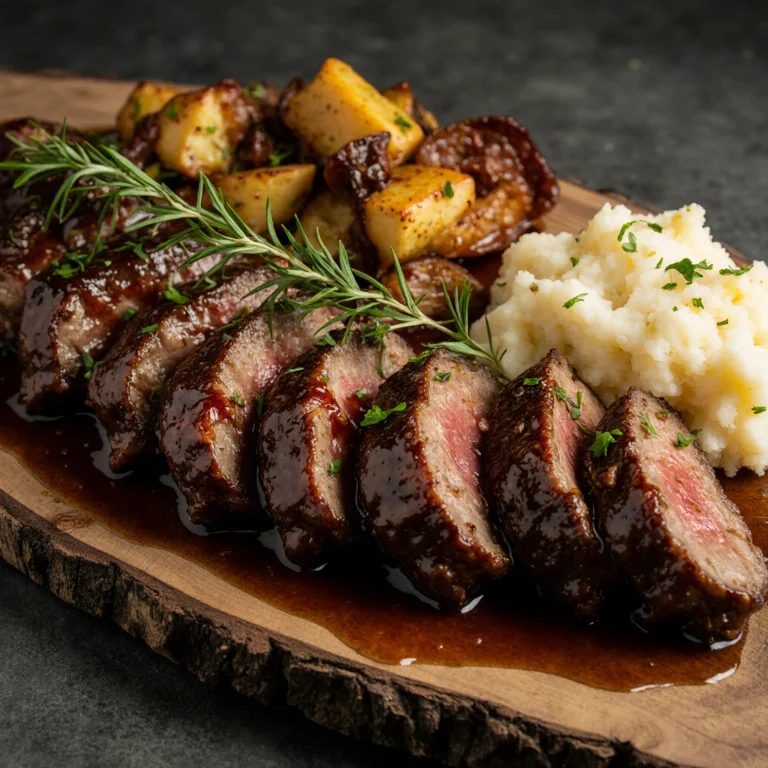
Step 11: Slice and Serve Correctly
Remove twine or toothpicks. Slice each braciole against the grain into thick rounds.
Serve with:
- Sauce spooned over the top
- Pasta, polenta, or bread on the side
Slicing against the grain ensures every bite feels tender, even at thicker cuts.
Why This Step-by-Step Braciole Recipe Works
This method respects the natural structure of beef while using time and technique to your advantage. You are not forcing tenderness—you are allowing it to develop naturally.
When you follow these steps carefully, your traditional braciole recipe becomes reliable, repeatable, and deeply satisfying.
How Long Should You Cook Braciole for Maximum Tenderness?
Cooking time depends on thickness and cut, but rushing never helps. Braciole needs time for connective tissue to soften.

Signs your braciole is ready:
- A fork slides in easily
- The sauce has thickened naturally
- The rolls hold together without tightening
If the meat feels firm, it needs more time, not more heat.
What to Serve With a Traditional Braciole Recipe
Classic Pairings
- Pasta with the same tomato sauce
- Creamy polenta
- Crusty Italian bread
Modern Side Options
- Roasted vegetables
- Mashed potatoes
- Simple green salad
Your sides should support the dish, not compete with it.
Storage, Reheating, and Make-Ahead Tips
One advantage of a braciole recipe is how well it stores.
Storage Tips
- Refrigerate up to 4 days
- Freeze up to 3 months
Reheating Tips
- Reheat slowly on the stovetop
- Add a splash of sauce to prevent drying
Make-Ahead Tip
Braciole often tastes better the next day as flavors continue to develop.
Common Braciole Recipe Mistakes and How to Fix Them
| Mistake | Result | Fix |
|---|---|---|
| High heat | Tough meat | Lower simmer |
| Loose rolls | Filling loss | Secure tightly |
| Thin sauce | Weak flavor | Reduce slowly |
Most issues are easy to correct once you understand the cause.
Traditional Braciole Recipe FAQs

What is the best beef cut for a braciole recipe?
Top round or flank steak works best for tenderness and flavor.
Why is my braciole recipe tough?
Usually due to high heat, short cooking time, or skipping the pounding step.
Can you make a braciole recipe ahead of time?
Yes. It stores and reheats very well.
How long should a traditional braciole recipe simmer?
Between 90 and 120 minutes at low heat.
Can you bake braciole instead of braising?
You can, but braising delivers better texture and moisture.
Conclusion: Why This Traditional Braciole Recipe Works Every Time
When you approach braciole with patience and technique, the dish rewards you. You do not need rare ingredients or complicated steps. You need understanding, timing, and respect for the process.
This traditional braciole recipe teaches you how to turn simple beef into something deeply satisfying. Once you master it, you will notice the difference not just in texture, but in confidence every time you cook it.
Call to Action
Now it is your turn.
Try this braciole recipe, apply the ten tenderness tricks, and make it your own. If you found this guide helpful, save it, share it, or leave a comment with your results. Cooking improves when you keep practicing—and when you cook with purpose, every meal gets better.